How to Make a Minecraft Server Plugin
The Minecraft community seems to accept an obsession with doing everything on YouTube. For some people that'due south great, but equally someone who is already a coder and I merely demand to know the environment-specific details for coding for Minecraft I take a really hard time sitting through an hr of tutorial videos only to get the four things I needed to know that I didn't already know how to exercise. This is where having a text and pictures version of a tutorial comes in handy, so you can skim through it looking for the parts yous still need to know, and easily skip over the stuff you already know. Another friend of mine was too recently trying to get into writing a plugin for Spigot, and everything I could find to point him at which was text-based rather than a YouTube video was very outdated, had instructions that were no longer relevant considering Bukkit and Spigot and Eclipse have all evolved since then, etc. Then I figured I'd write one, and here it is!
Update: since writing this up, I discovered a very nice page on the Spigot Wiki documenting much of this, which seems to be mysteriously absent from the search engine searches I did trying to find this information (or at to the lowest degree ranked depression plenty that all the YouTube videos and a bunch of forum posts that skirt this issue outrank it). How to create a Minecraft/Bukkit/Spigot plugin on the SpigotMC website. I'thousand posting this anyhow because I exercise a few things differently. Pick your flavor. 🙂
Setting up your development surroundings
Install Coffee
Yous demand the Java Evolution Kit, not the Runtime Environment. Download the Java SE JDK from Oracle's site. Brand sure y'all get the JDK, not the JRE, and make certain yous accept the right one for your operating system. Java.com only has JREs, you accept to get to Oracle's site for the JDK. Linux users can attempt installing the java-eight-openjdk package.
Annotation for Os Ten users: OS X no longer ships Java past default. It will automatically install if you lot endeavor to run something that needs Java, however, the version it installs is old (Java six) and Bukkit/Spigot evolution requires at to the lowest degree Java 7, and then you will need to download the newer Java even if y'all already take the system Java.
Download and Build Spigot
You need to link against Spigot in order to compile plugins, and so you'll need a local copy of Spigot to link to, even if y'all never actually run it.
Download BuildTools.jar from https://hub.spigotmc.org/jenkins/chore/BuildTools/
Place it in an otherwise empty directory. Open up a control prompt (or a last window) and navigate to the directory you placed it information technology. Run the post-obit command to build it:
java -jar BuildTools.jar
This will probably take a while. If all goes well, you should get a file called Spigot-1.14.2.jar in the same directory with BuildTools.jar (the version number in the filename may be different if Spigot has been updated since I posted this). Remember where this directory is, yous'll need it later when creating the projection in Eclipse.
Install Eclipse
Plugin development is done with a Coffee IDE. If you already have a favorite Java IDE, I imagine you tin make it work, but if you don't, I recommend Eclipse, and that's what my instructions will be based on.
You lot can get Eclipse here: http://www.eclipse.org/downloads/
Nigh Linux distributions have Eclipse packaged already and you lot tin probably use your package managing director to install information technology. Your mileage may vary in getting information technology to work. Personally, I've had bug getting Eclipse plugins to piece of work correctly because updating plugins sometimes breaks the way the packager packaged the chief app, and sometimes plugins want a newer version of Eclipse (Ubuntu ships an older version), and then I employ a re-create of Eclipse downloaded from eclipse.org rather than the i Ubuntu ships.
If you have more than 1 version of Java installed (OS X users, this is probably y'all), become into Eclipse's preferences, click the triangle next to "Java", and look for the "Installed JREs" section. Make sure the one you just installed is listed in at that place, and checkmarked. If it is not, click Add together, then click on Directory to the right, navigate to where you installed the Java JDK, and find the "jre" directory inside it. On Os 10, Oracle'due south installer will install within /Library/Java/VirtualMachines/. Examples:
Mac Bone Ten:/Library/Java/JavaVirtualMachines/jdk1.8.0_31.jdk/Contents/Domicile/jreLinux:/usr/lib/jvm/java-8-openjdk-amd64/jre
Install a YAML editor plugin to Eclipse
The file you create that tells Spigot how to interact with your plugin is in YAML format. Equally shipped, Eclipse does not understand how to edit YAML files (even though information technology's really only a text file). There are several plugins that will teach it how, though.
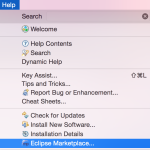
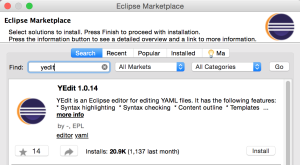
Go to Help -> Eclipse Marketplace, and type "yaml" into the Discover box. There are several plugins that can do this, find 1 you like and install it.
UPDATE 2019/07/thirteen: I used to recommend YEdit here (at the time I wrote this, it was the only one), but it's gone out of the Eclipse Marketplace. There are several others available now, whatsoever of them should work.
Creating your first project in Eclipse
Create the project itself
- Choose File -> New -> Java Project
- Enter the name of your plugin
- Choose Next (not Finish)
- Click the Libraries tab.
- Click Add External JARs…
- Cull the shaded version of the Spigot-API JAR file from the Spigot directory that y'all compiled in a higher place. Within the directory with BuildTools.jar the API file will be in
Spigot/Spigot-API/targetand will probably exist named something likespigot-api-1.14.2-R0-SNAPSHOT-shaded.jar - Toggle the triangle to the left of spigot-api
- Cull Javadoc Location
- Click Edit…
- In Javadoc location path, enter:
https://hub.spigotmc.org/javadocs/spigot/. This will permit the autocomplete in Eclipse to autocomplete Spigot API objects and methods. - Click OK
- Click Finish
Create a parcel
- Cull File -> New -> Package
- Enter the name of your package. This is usually structured like a domain name, but in contrary. Information technology should first with something that identifies yous, and and so have the name of the project at the stop, and be all lower-instance. Minecraft itself is internet.minecraft.server for example, Spigot is org.spigotmc, and the Bukkit plugin API is org.bukkit.plugin. I'll use tld.example.myplugin in the examples.
- Click Finish
Create the Principal grade
- Cull File -> New -> Grade
- Enter the name of the course which will be loaded by Spigot when it loads the plugin. You can really name this annihilation you desire (we'll deal with telling Spigot how to find it later), only for simplicity I'll call it Main in the examples.
- Side by side to Superclass, click Browse…
- In the search box, type JavaPlugin, and choose what should be the simply match (org.bukkit.plugin.java)
- Click OK
- Click Finish
It should automatically open in the editor, and you should now be looking at code that looks like this:
package tld.example.myplugin; import org.bukkit.plugin.java.JavaPlugin; public form Primary extends JavaPlugin { } There are two functions divers by the API which yous are required to implement. Those are onEnable and onDisable, which go run when your plugin is enabled or disabled. They don't need to exercise anything, but if yous have whatever resource that need allocating or disposed of, those are the places to do it. Add those two functions to your Main.java file, so that it looks like this:
parcel tld.example.myplugin; import org.bukkit.plugin.coffee.JavaPlugin; public class Principal extends JavaPlugin { @Override public void onEnable() { } @Override public void onDisable() { } } Create the plugin.yml file
- Cull File -> New -> File
- Select the top-level folder of your project (the project name)
- for the File proper noun enter
plugin.yml - Click Finish
It should open in the editor. If it doesn't, yous probable forgot to install YEdit up at the top of this tutorial.
This file volition be in YAML format, and describes to Spigot how to interact with the plugin. The superlative of the file leads off with some basic information nearly the plugin, and is and then followed past a description of the commands which are made available past the plugin.
main: tld.example.myplugin.Main proper noun: MyPlugin version: i.0 author: me description: An Case plugin commands: mycommand: description: An case command usage: /mycommand permission: myplugin.mycommand permission-message: You lot don't accept the myplugin.mycommand permission.
The "chief:" line needs to list the packet and class name of the class which is loaded past Spigot when it loads the plugin's jar file. "version", "author", and "description" are human readable, and shown to the user past the /plugins and /aid commands.
The "commands:" block should contain i line for each command you implement. If information technology's not listed hither, Spigot won't send the control to you lot when users use it.
Inside each control'due south block, the "description" and "usage" sections are shown to the user when they utilize the /aid control. The "permission" line describes which permission grants access to the command. "permission-message" is shown to users who don't take permission to utilise information technology if they endeavor to. The "permission" should first with the name of the plugin, a dot, and then an arbitrary permission name. Yous can also borrow some other plugin'south permission or a core permission. For example, if your plugin adds additional features to MultiWorld y'all could require "mw.admin" permission or so forth. You lot can get out out this line if you lot want it bachelor to all users.
Create your build script
To be able to install the plugin into Spigot, yous need to create a JAR file (Coffee Archive). You tin use File -> Export -> Java -> Java JAR to create it, but then you end up having to specify which files to include every time. In the long run, it'southward easier on you lot to gear up up Eclipse to automatically build information technology. So in this step we'll be creating a build script that defines the contents of the JAR file so that Eclipse tin do that.
- Go to File -> New -> File
- Choose the top-level folder (the name of your project)
- For File name enter build.xml
- Click Finish
Information technology should open in the editor.
Paste in the following:
< ?xml version="1.0" encoding="UTF-viii"?> <projection name="MyPlugin" default="makejar" basedir="."> <target name="makejar" description="Create a jar for the project"> <mkdir dir="target"></mkdir> <jar destfile="target/${ant.project.name}.jar"> <fileset dir="bin"></fileset> <fileset file="plugin.yml"></fileset> </jar> </target> </project> Where information technology says "MyPlugin" at the top, you'll want to replace with your project name. Too, WordPress adds a space between the < and the ?xml in the first line because it looks too much like the syntax used to commencement a php code block. Y'all'll demand to remove that space for the file to be valid.
Tell Eclipse to employ your build script
- Right-click (control-click or 2-finger-click on Mac) on the project name and choose Properties.
- Cull Builders on the left side.
- Click New…
- Choose Pismire Architect and click OK
- Set the name to
Make JAR - For Buildfile, enter
${project_loc}/build.xml(literally, including the $ and the braces) - Click the Refresh tab
- Checkmark Refresh resources upon completion
- Choose The projection containing the selected resources
- Switch to the Targets tab.
- Click on Prepare Targets… next to each of "Auto Build" and "During a 'clean'" and just click the OK button on the resulting dialog.
- Click OK to close out of the Edit Configuration window.
- Click OK to close out of the Properties window.
At this indicate you should accept a working project, and any fourth dimension you make changes to annihilation in your project, information technology will automatically rebuild the plugin'south jar file in the target directory. As long equally y'all've been saving your changes, information technology should always exist up-to-date with your code.
Commencement Coding
If you've followed the above instructions up to this point, you now have a working plugin file which does admittedly nothing, but has all of the necessary framework.
Oh, 1 more thing.
The plugin.yml file included a description of a command just to use an example of how to put that in the plugin.yml file. I would be remiss if I didn't as well give you lot the sample code for actually treatment that command. That goes in Main.java by adding an onCommand() handler function. Your final Main.coffee would look similar this:
packet tld.example.myplugin; import org.bukkit.command.Command; import org.bukkit.control.CommandSender; import org.bukkit.plugin.coffee.JavaPlugin; public class Main extends JavaPlugin { @Override public void onEnable() { } @Override public void onDisable() { } @Override public boolean onCommand(CommandSender sender, Control command, String label, String[] args) { if (command.getName().equalsIgnoreCase("mycommand")) { sender.sendMessage("You ran /mycommand!"); return true; } return faux; } } Additional Resource
Spigot Plugin Evolution Folio
Spigot API Reference
UPDATED 2016/05/06: Still works in ane.9, so updated references accordingly. Fixed step 6 in creating the project to apply the shaded version of the API file. Thanks to several people in the comments for pointing information technology out.
UPDATED 2017/02/21: I haven't had a chance to try it myself recently, but multiple people accept said in the comments that this even so works in ane.eleven.x, so I've updated the references accordingly.
UPDATED 2019/07/xiii: Likewise. Haven't tried it myself, but people are maxim it nonetheless works in ane.fourteen.x in the comments, then updating the title and references. Also added a note near YEdit being gone from the Eclipse Marketplace.
UPDATED 2019/07/22: Looks like WordPress finally broke the syntax highlighter plugin I've been using that hasn't been updated in 4 years, just replaced it with a Gutenberg-uniform i and attempted to set up the formatting of the lawmaking. Build.xml in particular was completely hosed, it should be fixed at present.
DOWNLOAD HERE
How to Make a Minecraft Server Plugin TUTORIAL
Posted by: brendatwereent.blogspot.com


Comments
Post a Comment